Use your network in shiny with visNetworkOutput and renderVisNetwork
require(shiny)
require(visNetwork)

server <- function(input, output) {
  output$mynetworkid <- renderVisNetwork({
    # minimal example
    nodes <- data.frame(id = 1:3)
    edges <- data.frame(from = c(1,2), to = c(1,3))

    visNetwork(nodes, edges)
  })
}

ui <- fluidPage(
    visNetworkOutput("mynetworkid")
)

shinyApp(ui = ui, server = server)
Shiny interactions
a input is created when the network has been initialized :
input$mynetworkid_initializedwith
nodesIdSelection, you can access new input with current selection value :
output$mynetwork <- renderVisNetwork({
  ... visOptions(nodesIdSelection = TRUE)
  })
# created input$mynetworkid_selected- with
selectedBy, you can access new input :
output$mynetwork <- renderVisNetwork({
  ... visOptions(selectedBy = "group")
  })
# created input$mynetworkid_selectedBy- with
manipulation, you can access new input with information about manipulation :
output$mynetwork <- renderVisNetwork({
  ... visOptions(manipulation = TRUE)
  })
# created input$mynetworkid__graphChange
Modify your network with visNetworkProxy
In order to not redraw the entire network, you can use visNetworkProxy function in shiny and then change the configuration of your network without redrawing it.
You can use almost all the functions available on a visNetworkProxy, and even some special functions!
classic functions :
visNodes,visEdges,visGroups,visOptions(>=0.2.2),visPhysics,visInteraction,visLayout&visHierarchicalLayoutspecial functions (vis.js methods) :
visFocus: focus on one target nodevisFit: fit view on one or several nodesvisUpdateNodes/visUpdateEdges: update / add datavisRemoveNodes/visRemoveEdges: remove datavisSelectNodes/visSelectEdges/visSetSelection: selectionand also
visRedraw,visStabilize,visSetData,visGetPositions,visMoveNode,visUnselectAll
require(shiny)
require(visNetwork)

server <- function(input, output) {
  output$network_proxy_nodes <- renderVisNetwork({
    # minimal example
    nodes <- data.frame(id = 1:3)
    edges <- data.frame(from = c(1,2), to = c(1,3))

    visNetwork(nodes, edges) %>% visNodes(color = "blue")
  })


  observe({
    visNetworkProxy("network_proxy_nodes") %>%
      visFocus(id = input$Focus, scale = 4)
  })

  observe({
    visNetworkProxy("network_proxy_nodes") %>%
      visNodes(color = input$color)
  })

}

ui <- fluidPage(
  fluidRow(
    column(
      width = 4,
      selectInput("color", "Color :",
                    c("blue", "red", "green")),
      selectInput("Focus", "Focus on node :",
                    c(1:3))
    ),
    column(
      width = 8,
      visNetworkOutput("network_proxy_nodes", height = "400px")
    )
  )
)

shinyApp(ui = ui, server = server)
Build your own input
With great htmlwidgets, it’s also possible to build custom shiny input from visNetwork. For this, just use Shiny.onInputChange function in javascript event. This is an example of passing the node id when you hover over it :
library(visNetwork)
library(shiny)

server <- function(input, output) {
  output$network <- renderVisNetwork({
    # minimal example
    nodes <- data.frame(id = 1:3, label = 1:3)
    edges <- data.frame(from = c(1,2), to = c(1,3))

    visNetwork(nodes, edges) %>%
      visInteraction(hover = TRUE) %>%
      visEvents(hoverNode = "function(nodes) {
        Shiny.onInputChange('current_node_id', nodes);
      ;}")
  })

  output$shiny_return <- renderPrint({
    input$current_node_id
  })
}

ui <- fluidPage(
  visNetworkOutput("network"),
  verbatimTextOutput("shiny_return")
)

shinyApp(ui = ui, server = server)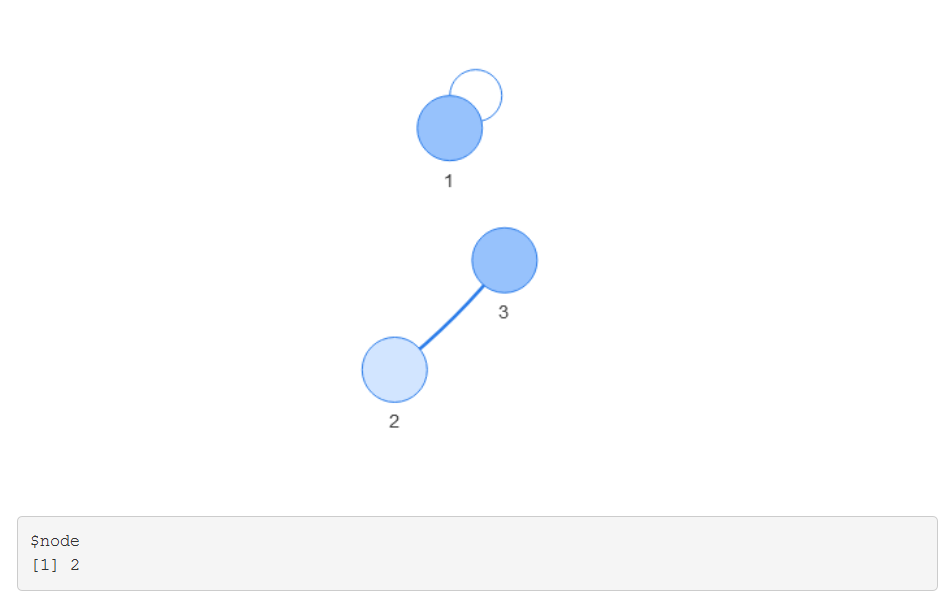
Need some examples ?
Have a look at the “demonstration” shiny apps :
shiny::runApp(system.file("shiny", package = "visNetwork"))